Tuesday, November 25, 2014

LiveCode Mobile Development Cookbook


In K12 education today, the emphasis on teaching students and universal common set of learning standards, coupled with the ability to develop unique solutions to open ended problems lends itself to coding and computer programming. There are a plethora of apps and software tools that provide students with some of the fundamentals and programmatic thinking principles necessary for learning to code/program. However, these tools do a great job at providing the underlying thinking, but not so good a job of allowing learners to develop working applications ready for public distribution to the most common computer platform, mobile computing.

Edward Lavieri's new book, LiveCode Mobile Development Cookbook does a great job of supporting learners beyond the programmatic thinking and into real app development using LiveCode. The book does a nice job of scaffolding the learning from the initial configurations for developing, for both the iOS and Android platforms, all the way up to utilizing databases within your app for storing and retrieving data. The later chapters of the book focus on providing modules for standardized mobile user interfaces and for including multimedia components in your apps.

The book assumes some prior familiarity with LiveCode, but presents its content in manageable chunks, with easy to follow and well documented tutorials.

I would recommend this book for anyone ready to take their programming beyond the theoretical and into actual app development stage. This book easily supports a second tier coding/programming class, where students have mastered introductory concepts and are ready put that thinking to use in developing actual solutions.  (https://www.packtpub.com/application-development/livecode-mobile-development-cookbook)

Monday, November 10, 2014

Memory Game Built Using LiveCode


How good is your memory?

Here is a little LiveCode example project based on the old memory game that requires that you repeat a specific pattern. The game begins by clicking the start button and will continue incrementing up until you make a mistake. How high can you go? I pretty much bomb out at 7 or 8 steps.

This LiveCode example works both as a desktop application or as a iOS mobile application. The scripts/code for this project live in the “Start” button, the Card script, and the colorful game buttons: one, two, three, and four. The card script contains the CheckProgress command which determines whether the player is correct or incorrect. It also contains, essentially, a matching series of code that the desktop version of the Start button uses, but incorporates the iOS specific commands for mobile. If you compare the iOS code in the Card script, and the desktop app code within the Start button, you will notice some similarities.

The musical notes were created in Apple’s Garageband and saved as mp3 and wav files. The mp3 files are referenced from within the iOS package (they are included as individual files in the apps sandbox) in order to play and the wav files are imbedded into the application for playback in the desktop version. (MP3 files were converted to wav files using the OSX terminial application afconvert.) You will notice differences between the desktop code and the iOS mobile code.

Finally, to address different screen resolutions on both an iPad and an iPhone, it uses the “fullScreenMode function within LiveCode, a relatively new addition to the development tool, to make adjusting screen resolutions automatic. The application will automatically resize itself to fit within the devices screen resolution. It is one line of code within a preOpenStack call: set the fullScreenMode of this stack to “ExactFit.” That’s it.

The Memory Game project file is available here: Download .

Here is a short YouTube video explaining more about the process of creating the memory game example with LiveCode and a peak at the code:


Monday, November 3, 2014

Puzzle Pullooza App With LiveCode

This little puzzle example started out as a little Sunday evening mental exercise. How to create a simple puzzle activity that would work well as a desktop application and as a mobile application. As a result of that effort, I think this little project does a great job of showcasing some of the great features of creating mobile and desktop apps with LiveCode. There is actually a great little book by Colin Holgate, LiveCode Mobile Development, https://www.packtpub.com/application-development/livecode-mobile-development-beginners-guide, that I would recommend that gives another puzzle app example and much more. It’s an easy read and great way to introduce yourself to LiveCode.


Now, back to Puzzle Pullooza. The app is pretty basic in appearance and in its code. To begin, the majority of the code is in the stack script. Here is a Google Docs link where I have shared the code: Puzzle Pullooza Code . You can see from the Google Doc, the code is pretty easy to understand. I have attempted to comment each section of the code to explain what it does. But, you may be able to decipher what the code does without even understanding much programming.

In order to begin poking around the app and discovering how it works, I would recommend you download the free LiveCode Community version of the software, http://livecode.com/download/. This is the full version of LiveCode, but the OpenSource version. You can create apps, compile apps, and do everything you can with the commercial version, you just can’t sell what you create in the Apple App Store.

Once you have downloaded and installed the Community Version of LiveCode, you can download the Puzzle Pullooza app here: Download Puzzle Pullooza

Open it up and have a loop around!

The Puzzle Pullooza app showcased many of the nice feature built into the development tool. First is the ease at which code is written in the development tool, as I shared earlier. The coding features mirror many other development tools, but the plain language, and effort to create with LiveCode far outshine other development tools, in my humble opinion.

As with most applications under development, Puzzle Pullooza suffered from “feature creep.” It was very easy to take components others had shared in their projects and incorporate them into my app.

For example, I added a timer another LiveCode developers had shared online. There’s nothing like adding a stopwatch/timer to increase your level of urgency when solving a puzzle. There is also a very active LiveCode developer list, http://livecode.com/community/, and great Developer resources here: http://livecode.com/developers/.

I thought it would be neat to have folks share out on Twitter when they completed a puzzle. This component demonstrates how easy it is to build a custom web browser directly in your app. In this case, the web browser’s only purpose is to provide the twitter interface for posting to Twitter.

I’d encourage you to take a look at LiveCode. It is a great tool for students and those learning to code. The free Community Edition makes it a “no (cost) brainer.”


Wednesday, October 15, 2014

Swivl 'n Through the Classroom

I had an opportunity to try out a device on Monday at one of our school staff meetings called a Swivl. I was a Kickstarter backer for the company when they were first getting started. The Swivl bot allows you to take your iPhone or iPad and place it in a slot on the Swivl to assist with video recording. It comes with a “puck” like device that you hold in your hand or wear around your neck. The Swivl follows this puck and allows you to move around the room freely while video taping yourself. It’s a great solution if you are interested in improving your classroom instruction, but you don’t want somebody else videotaping you while you teach. My video is not the best, as I made a few rookie mistakes. Here’s a few things I learned:
  1. Be sure you place your Swivl in a location that is not facing any bright lights, such as a large window. Your device camera will underexpose the video due to all the light coming in the window. Duh.
  2. You can control the resolution of the video on your device, but if you do not, remember a 45 minute video will take a considerable amount of storage on your mobile device. My 49 minute video was 3.8GB. That might not seem like a lot on a computer, but on a year old mobile device, that is considerable. You will also want to load that video up to the Swivl Cloud, or move it to your computer so you can delete it from your mobile and free up that storage space on your mobile.
  3. Be sure your mobile device is completely charged. I recorded the example below and my iPhone5 was at a 95% charge. It died at 49 minutes. The age of your device will probably add or subtract time. The Swivl uses Bluetooth which has been known to be a little power hungry on mobile devices.
  4. Place your Swivl on a tripod to get it just above the heads of your audience.

http://cloud.swivl.com/v/8c11c5a1961afa084e13263cb5fdc205


Wednesday, October 1, 2014

Create Close Reading Activities for Your Students in LiveCode

Something I read this morning got me thinking about “close reading” activities for students. There are many different examples of them. I thought I’d take a few minutes to code up and example using LiveCode. I tried to add comments in the code as much as possible. The code is in the button, “Create Activity” and there is one function in the card script. (You will need to download the free LiveCode Community Version to open this project.)


This little example is just a quick prototype. It is not finished but could be easily taken and built upon.


I can envision this being used a teacher tool that creates close reading activities for students. Teachers could create entire collections of these activities and then store the students results. The main idea was something that was simple and quick for teachers to use.

The large top left field is where the teacher pastes the student reading selection. I should warn you that none of the text fields are protected (locked) so you can accidentally delete content or resize objects etc. If you mess something up, you can always download another copy.


The button titled, “Create Activity” is where the magic happens. After you have pasted your text selection, clicking the Create Activity button start the activity. A series of three buttons is created each containing a random word from the text selection. One of the words in the text selection has been replaced with a blank line, “*______*.” The student is responsible for selecting the correct word from the three choices (buttons).


There are many ways this activity could be tweaked to provide a different flavor of activity. Hopefully it will give you some ideas. The LiveCode project is available here: “Another Close Reading Activity Build in LiveCode.”


Just another simple example of some of the things you can do with LiveCode :)

Thursday, September 25, 2014

Google Apps GAFE Account Creator App - Built With LiveCode

Just a quick example of where learning how to code can help you get the things you need to do everyday done a little quicker. I often get requests from teachers for additional Google Apps Accounts. These can come in at all times of the day when teachers are diving into activities in Google Apps with their students and they may get a new student. It’s not always convenient to login into the Google Apps administration panel and create a single student account. Plus, if you’re using the command line app GAM (Google Apps Management), you have to type in the GAM command and then the second command for moving the student into the correct Organizational Unit. This process can get old quickly.

So to facilitate the creation of new, one-off student accounts, I created the OOGAG application. The One-Off GAFE Account Generation (OOGAG) tool. This tool was created with my favorite program development tool, LiveCode. I use a feature in LiveCode that allows me to integrate GAM. The OOGAG application essentially creates the GAM script using a GUI (graphic user interface) I created and then calls on GAM to create the GAFE (Google Apps For Education) account.


If you choose to try out the tool, be sure to install GAM and follow the directions for allowing it Google Apps permissions, etc.


You can download OOGAG here. This version of the application is uncompiled so you will need the Community Edition of LiveCode to run the application. Feel free to open the hood and poke around in the code. This uncompiled version will open in Windows, Mac OS X, or Linux.


Friday, July 25, 2014

Host Your Own Minecraft Server for Free on Amazon Web Services

For educators interested in improving their Minecraft skills, nothing beats having your own server that you can share with a few key experts (aka students). Those folks that have never used Amazon Web Services in the past can create a virtual server for free for a whole year. This will allow you to explore Minecraft on your own schedule from anywhere on the planet and with whom ever you wish. The following free eBook is a tutorial on how to get started. It is written from a Mac users point of view, but information is relative to Windows and Linux users too.


(Open in iBooks or any ePub compatible eBook reader.)

Monday, July 14, 2014

Designing Classroom Learning Spaces

https://drive.google.com/file/d/0B7WmI6kEEJPATEY0WE5hNGtNYTg/edit?usp=sharing

I had the great fortune of attending the Nueva Design Thinking Institute in June for four days. Nueva is one of the pioneers in integrating Design Thinking into the k12 curriculum. Learning spaces can contribute greatly to the effectiveness of learning and curriculum design. Nueva School, with support of the Stanford D School, have created a wonderful environment for students to learn. The following eBook (epub) contains some of the things I learned about their physical learning environments and can provide some ideas and thinking related to creating similar learning spaces. Let me know what you think!


Friday, May 16, 2014

Manage All Your iOS Devices at School For Under $1000


For years now third party vendors have been providing solutions to manage iPads and other iOS devices. These systems often can run in the thousands of dollars each year, as many are often based on a subscription type fee structure requiring a renewal each year. In many cases, the third party management solutions required you to still use Apple Configurator in order to get the third party profile on the device for remote management to work.

If you wanted to stay completely within the Apple ecosystem, and prevent finger pointing when issues arose, you were pretty much restricted to using Apple Configurator and always being tethered to the computer running Configurator to manage your student and staff devices.

This is not the case anymore. With Apple’s Mavericks Server and a Mac Mini computer, you can have the same capability as these third party systems but stay completely within the Apple ecosystem, and do it all for under $1000.

With Apple Server and its accompanying services, Users, Profile Manager, Websites, Open Directory and the new deloy.apple.com web site, you can have pretty much the same capabilities at a fraction of the cost.

In our district this year, we implemented a 1:1 iPad project for all sixth grade students. In the following years we will be adding 7th and 8th grade. We have deployed standalone Mac Mini servers at each of our middle schools. These are standalone computers located in our technology closets, no monitor, no keyboard and no mouse. We use VNC to log in remotely to them when needed, and as Profile Manager is all managed through a web interface, we can login from any computer on our network to manage our iPad devices.

We are able to manage restrictions on devices, push free and fee based apps, wipe and lock devices, and much more. Also, with our Enterprise Developer license and LiveCode, we are able to push home-grown apps directly to the student and staff iPads. This last point is something we are really excited about as we can now push interactive ebooks, learning guides, and targeted instructional apps we build, directly to student and staff devices over the air.

The following is a short video on how you can use these tools to manage your own deployment of classroom or school iPads:

Thursday, March 20, 2014

Evening Homework Observations...


I get home from the gym yesterday evening and my 9 year old daughter is doing her homework on the table the two of us built a couple years ago. She’s busy completing her work, collaborating with her classmate via video chat. I was struck by how ordinary she appeared as if saying unconsciously, “Why wouldn’t you collaborate with your classmate remotely to finish your homework via remote video chat?” She did not ask her mom if she could video conference with her friend, she just connected, as simple, and as common, as taking a pencil out of her backpack and beginning her school work.

This morning, I had to take Sawyer to school. Not my usual morning trip as she goes with mom. Mom teaches fifth grade at her school. Getting into the car she tosses her rolling backpack into the back seat, slides into the front seat next to me, and immediately plugs her cracked, two year old iPad touch into the car charger. On arriving at school, she hustles out of the truck, drags her monolithic backpack out of the back seat, tells me she loves me, and snatches the iPod touch in her other hand and marches off. She doesn’t ask if she can take her iPod touch, there is no hesitation in her actions, it’s a non-issue to her. It seems as common to her as taking a pencil out of her backpack and beginning her school work.

I have son who started his first year of college this year. This is not how fourth grade was for him ten years ago.

Monday, February 17, 2014

Using Google Forms As A Peer Evaluation Tool


One thing I see teachers constantly struggle with is the never ending task of reviewing, grading, commenting, and recording everything there students do in class. Granted, teachers do not grade everything that happens in class, but from what I have seen they grade enough student work outside of class to occupy a decent amount of evening time at home and then additional time on their weekends. Plus, this work does not include the amount of prep time a dedicated teacher burns through outside of the 8-5 work day.

One possible strategy to address some of these challenges is to provide students with the critical thinking skills to enable them to evaluate each others’ work. Peer evaluation is a strategy that has been around for a long time in our classrooms. It is not without its own challenges, but I have been thinking of ways that technology can assist with addressing those challenges.

If you are a teacher working at a school that currently uses Google Apps for Education and you are lucky to have access to a cart of Google Chromebooks, you have the tools necessary to make peer evaluation a little easier to implement and a little more data driven. Google Apps for Education is a suite of applications including a word processor, presentation application, spreadsheet application, (web) sites creation software, and the one we are going to use for our peer review assignment, Google forms.


Google forms allows you to easily create digital surveys. The survey in this example would be used to help students evaluate the work of their peers. Ideally a peer evaluation/survey tool would be created collaboratively, with the students helping the teacher determine the characteristics of a successful piece of work. The strategies to create a good peer evaluation tool could consist of another whole blog post and in the spirit of brevity I will save that for another post.

Google forms allows you to create an evaluation tool that can consist of any type of multiple choice options you wish. In addition to having students select from options in the survey, students can also contribute feedback via short answer text fields. Your imagination will be the only limiting factor when developing your peer evaluation tool, and since it is wide open, you’d be hard pressed not to find something in class that can’t be peer reviewed.


Upon the completion of a peer review activity, the resulting student data is saved in a Google spreadsheet. Google Forms can also collect the Google user account information of the students doing the reviewing, so you’ll have a record of which students completed an evaluation. (I should also mention that you’ll probably want to include a drop down selection menu consisting of all the students in the class. One of the options on the peer evaluation tool your student will make is who they are evaluating. This can easily be done by having a pre-constructed list of students accounts, copying it, and then pasting it into the first field of the drop-down survey item. The Google form will create additional fields automatically for the rest of the students in your pasted list.)

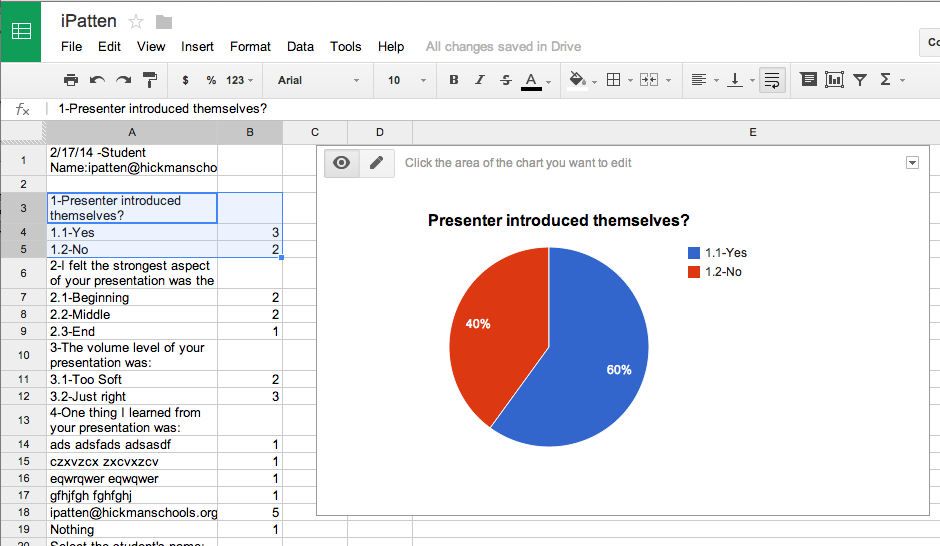
The spreadsheet that contains all your student data can be sorted by student, or any other column in the spreadsheet. In the Google Form menu bar, under Form, there is an item labeled “Show summary of responses.” This will create a report that consists of the combined data for your whole class. The data is presented in chart view and in a combined format. It provides a quick view of how your class did in total on the assignment based on the peer reviews. The one thing missing from using Google Forms as a peer evaluation tool is an easy way to provide individual reports to students.

In order to create individual student reports from the spreadsheet the teacher would be required to sort, copy and paste individual student data into new documents. I have looked through many of the available Google scripts and have not found one that will create individual documents based on a specific spreadsheet column (student name.) The ideal Google script would take the the sorted class data, create a new document based on all the student’s peer evaluations, calculate the contributed data, and dump that data into a new Google document that could then be shared with the targeted student. Alas I could not find such a script. So, I created an application to do it for me.

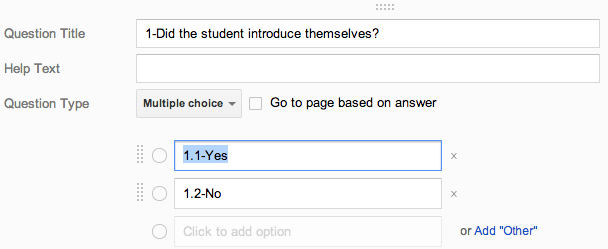
The application I created requires that the peer evaluation tool adhere to a specific numbering format. For example, if one of the evaluation components is to determine whether or not a student introduced themselves in an oral presentation, the items on the Google Form would need to be numbers as such: 1-Did the student introduce him/herself? The items would then appear as: 1.1-Yes and 1.2-No. As illustrated in the graphic below.


If the numbering format is not adhered to then the resulting report does not group the questions and items correctly.

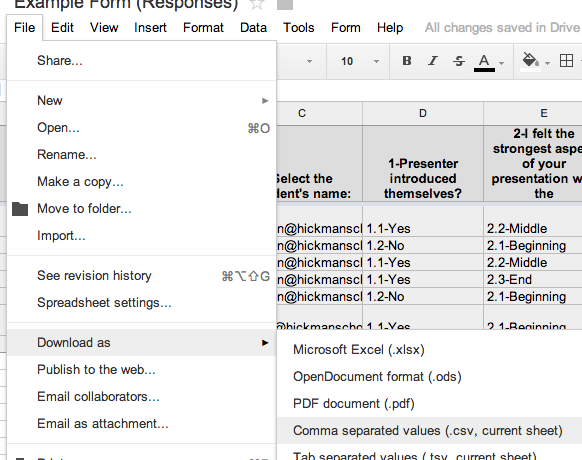
In order to generate individual student reports the teacher will need to download their Google Form data spreadsheet as a csv file. This can be done from the file menu in the Google Form menu. 


Upon starting the report application, the teacher will be presented with a button to select and import the csv file. Next the teacher will tell the application what column in the spreadsheet should be used to identify the students. Finally the teacher will select a specific student to generate a report for from the list of students in the student pop-up menu. When a student is selected the application combines all peer reviewed items, calculates the data, and shares any comments contributed by the students peers in the large text field. This report can be edited on the spot by the teacher or copied and pasted into a new Google Doc or email message. In addition, the student feedback can be exported out as a csv file. The resulting csv file can then be shared with the student, imported into a Google Spreadsheet, and subsequent lesson can be initiated teaching students how to generate charts and graphs based on their peer feedback. 


Additionally information that you do not want contained in the report, such as timestamps, can be deleted from the report data prior to being saved or emailed in a new document.
 

The application was created with the free Community Edition version of LiveCode (http://livecode.com/). The application is provided below as a standalone application for both Windows, Macintosh, Linux and in non-compiled format that can be opened and edited within LiveCode CE. You can download LiveCode CE here: http://livecode.com/


http://livecode.com/ 


 Uncomplied LiveCode Project: 
http://jpatten.on-rev.com/peerreviewreporter/Google-PeerReviewReporter.livecode

Macintosh 
http://jpatten.on-rev.com/peerreviewreporter/PeerReviewReporterMacOSX.zip


Linux 
http://jpatten.on-rev.com/peerreviewreporter/PeerReviewReporterLinux.zip


Windows 
http://jpatten.on-rev.com/peerreviewreporter/PeerReviewReporterWindows.zip

Let me know what you think, and if you try it out with your students please let me know how it went.